Desktop Hard Drive Removal Instructions
Step 1: Opening the case
WARNING: The edges of metal panels can cut skin. Be careful not to slide skin along any interior metal edge of the computer.
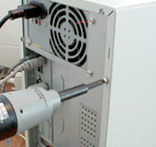
1. Unplug all cables.
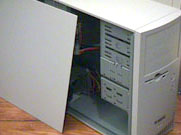
| 2. Remove the screws on the rear of the PC. | 3. Slide both side panels off from the back of the PC. |
 |
 |
4. On other cases, it may be necessary to remove the front of the PC so that you can remove the drive cage. If so, press in on the tabs that retain the front cover, and pull forward. Carefully detach any cables that may also be attached to the front cover.
Step 2: Disconnecting the cables
1. Locate the hard drive. The hard drive is usually under the CD and DVD drives and has a thin flat ribbon cable.
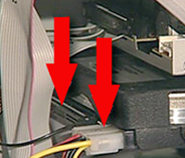
2. Disconnect the IDE or Serial ATA cable and the power cable from the back of the drive.
| IDE Hard Drive | SATA Hard Drive |
 |
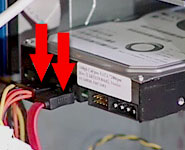 |
CAUTION: You need to unlatch the cables for Serial ATA drives. Press the latch and pull the cables. Failure to unlatch the connector may damage the hard drive.
Step 3: Removing the drive
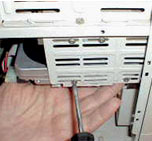
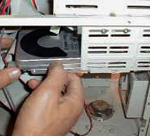
- If the drive is attached to the chassis or drive cage with screws, remove the screws and slide the drive out.
- If the drive is retained by a plastic latching system, lift the latch to slide the drive out.
 |
 |







Great company!
I think it is the best company in the world regarding data recovery. They take all types of recovery cases with great responsibility and ensure they work with the best possible solution for your specific case. I highly recommend it.
Superb effort
Superb effort from werecoverdata. I had no idea how to fix it when I faced a horrible problem with my RAID NAS. But they solved it very quickly and superbly. I recommend them!
Fantastic results
Thanks to all staff of werecoverdata for excellent work and for getting my company data back! I got frustrated when a deadly drop damaged my hard drive. But they solved it!
Thanks
Few days ago my raid server is crashed dangerously. It was not starting any more. I tried in a various way whatever I know but I could not fix it. My uncle told me about WeRecoverdata. Then contact with them and they repaired it. Thank you guys.
Recover service
Those are suffering bad experience of getting a reliable and professional recovery service provider, definitely, they can choose werecoverdata. I highly recommend it.
Thanks a lot
The location is a bit hard to find out but eventually, I did. They recovered my hard drive, which was mostly dead. Thanks a lot.
Great response
Definitely weRecover team is great to solve that kind of hard drive problem. Great response and remarkable. They recovered my all data successfully within short time. I wanna give special thank to David. Thanks a lot man.
Liked Your Service
I have been using my HP laptop since 2016. Few months ago I could not open my laptop. After pressing the power button its showing nothing. My friend told me about that company. They recovered my laptop. Now its working perfectly. Thanks a lot WeRecoverData.
Pretty good experience
It was really pretty good experience. They are so professional, punctual and reliable. I strongly recommend it.
Remarkable Work
A lot of thanks to werecoverdata. You did really remarkable work. I was frustrated when lost my important data from a hard drive. I sent my hard drive to WRD then they got all the data back. At first, I couldn’t believe anyone can recover it since my computer tech said he can’t do it. All credit goes to werecoverdata.
Gorgeous service
Fantastic service from all the guys at werecoverdata. I was having pressure when corrupted data from my hard drive .Then I went there and they fixed it superbly.Thanks for removing the pressure!
Extremely well
I faced horrible problem but they solved it extremely well.My problem was that hard drive crashed dangerously.At this moment I thought the sky was broken on my head.Thank you for that.
Sensible
Thanks to WeRecoverData. You fixed the hard drive problem promptly. I am impressed… Anybody can rely on werecoverdata.
Well done
Thank you
Great work
Obviously great work from werecoverdata.Definitely no doubt about this company because they take seriously to solve any kinds of problem.I have lot of assurance at them.A lot of thanks to them.
Fantastic work
Oh Tom really fantastic work. You saved my important days. Raid 5 server damaged dangerously few days ago. But you fixed it well. Thank you for that!
Great efforts
All credits goes to werecoverdata for recovering raid server.I thought impossible to repair it but they was taken sensible and fixed it.Now I can fully trust on werecoverdata.All thanks to them.
Helpful Work
Werecoverdata, you did a really very helpful work.I was angry when my hard drive got dropped from my mistakes. I recommend the company and give a lot of thanks to werecoverdata.
Best service
After my hard drive crashed I was going to be totally mad. One of mu cousin suggested me to meet that company. I did and got the best service ever I had.
Remarkable Job
AWESOME service from WeRecoverData. I was almost mad when my pc crashed. A lot of valuable data in my hard drive. One of my friend recommend it. I thought it will not be possible.
But after all I got back my all data. Thank You WeRecoverData.